Turning a
web camera
into an ophthalmoscope is a simple matter, in principle. The "in principle" byline is important because webcams are physically small units and a good deal of care is needed to assemble the components properly. The following describes a first trial version of a simple, hand-held, direct ophthalmoscope. Making a "scope" for indirect viewing is also possible, of course, but is more complicated. The image quality of low-cost webcams is quite limited and it may not be worth the effort to try the indirect way.
Conventional, opto-mechanical ophthalmoscopes are fairly complicated devices. One of the most complicated parts is the lens carousel used to adjust for refractive errors. Fortunately, such carousels are not required for camera-based scopes, which can use conventional focus adjustments instead. This simplifies the build considerably.
The basic direct scope principle is to arrange for nearly co-axial illumination and viewing light paths, as indicated in the semi-schematic figure to the right (dimensional unit = millimeter, mm). In the trial scope, illumination is provided by a white light-emitting diode (LED). The emitted light passes through two small apertures that limit the beam diameter. The beam is deflected 90° by a right-angle prism. Note that the illumination beam (blue) emerges close by the top of the prism, to meet the requirement of near co-axiality with the viewing beam (red).
The webcam views the illuminated fundus area from a position just above the deflection prism. The positioning is critical. Best results will be obtained when the camera lens straddles the top of the prism. The lens contained in the original webcam had much too short a focal length (ca. 3 mm) for this application. A focal length of ca. 10 mm provides a reasonable field of view for normal pupil sizes and minimizes disturbing reflections from the illumination beam. A larger field requires a shorter focal length, a wider illumination beam, and dilatation of the pupil.
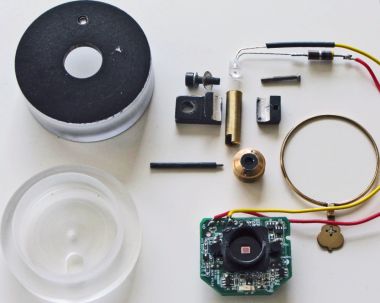
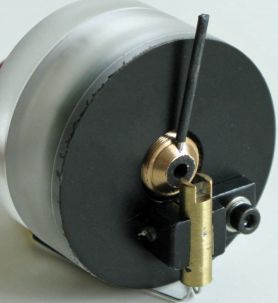
The photographs provide an overview over the components (the trial lens is included to indicate size) and a face view of the assembled scope. Additional technical details are provided at the bottom of the page.
The webcam scope is quite sensitive to stray light and is best used in a dark room. Working distance is very short, on the order of millimeters.
The image quality is limited by the plain lens and the low resolution of the image chip (VGA, 640 x 480 pixels). This is a far cry from conventional fundus cameras, as exemplified
here.
However, live views are slightly better, provided that the examined subject is capable of steady fixation and that the examiner has a steady hand. Nevertheless, image quality is not good enough to recognize minor abnormalities. The small field of view and the slow frame rate (30 Hz) are additional drawbacks. Like the
iPhone scope described elsewhere on this site, the webcam scope is not really a useful clinical tool. In combination with better lenses and brighter LEDs, the new generation of HD-capable webcams may have a better potential.
Technical details
The camera unit was taken from a
Logitech
QuickCam E 2500 web camera. The original housing could not be used because of its deeply recessed lens mount. Instead, the circuit board, which carries a lens holder, was extracted and mounted in an acrylic cylinder. The original lens was replaced with a simple double-convex lens of 10 mm focal length. It was fitted in a small brass cylinder threaded to mate with the circuitboard lens holder (Ø12 mm, pitch 0.5 mm). The new lens assembly was made to protrude from the scope housing. A small lever allowed focus adjustments.
The illumination unit was contained in a section of brass tubing, which was fastened to the housing front surface with an adjustable clamp. The "ultrawhite" LED, rated at 7 cd, needs but little power (30 mA at 3.5V), making it possible to tap the USB connection on the circuit board, using a 47Ω in-line resistor. The LED lens was cut off and the cut surface was polished to obtain a near point-size light emitter. The back-silvered deflection prism was fitted to the top of the illumination unit. Back-silvering helps to prevent stray light from entering the camera lens.
The camera lens and the prism were purchased from
Anchor Optics (no affiliation). There may be other sources.
The original QuickCam software allows several adjustments of image properties. The automatic exposure control usually worked fairly well.
Experimenting with webcams is not very expensive. The cost of the original camera and the optical components used here amounted to about USD 40. But workshop time amounted to many hours.
 The basic direct scope principle is to arrange for nearly co-axial illumination and viewing light paths, as indicated in the semi-schematic figure to the right (dimensional unit = millimeter, mm). In the trial scope, illumination is provided by a white light-emitting diode (LED). The emitted light passes through two small apertures that limit the beam diameter. The beam is deflected 90° by a right-angle prism. Note that the illumination beam (blue) emerges close by the top of the prism, to meet the requirement of near co-axiality with the viewing beam (red).
 The webcam scope is quite sensitive to stray light and is best used in a dark room. Working distance is very short, on the order of millimeters.
The image quality is limited by the plain lens and the low resolution of the image chip (VGA, 640 x 480 pixels). This is a far cry from conventional fundus cameras, as exemplified
The webcam scope is quite sensitive to stray light and is best used in a dark room. Working distance is very short, on the order of millimeters.
The image quality is limited by the plain lens and the low resolution of the image chip (VGA, 640 x 480 pixels). This is a far cry from conventional fundus cameras, as exemplified