The following describes a first trial version of a simple direct ophthalmoscope based on the Apple iPhone 5. The basic principle is the same as that of the webcam 'scope described elsewhere on this site and involves arranging for nearly co-axial illumination and viewing light paths. This can be achieved by superposing a parallelogram-shaped prism on top of the inbuilt light-emitting diode (LED), as shown in the semi-schematic figure below.
The prism deflects the illumination beam (blue) 90°, twice. Note that the beam emerges close by the tip of the prism, to meet the requirement of near co-axiality with the viewing beam (red). Positioning is critical, particularly when aiming for use with natural, undilated pupils.
The focal length of the camera objective is much too small for this application. Several variants of focal length extenders are available commercially but finding one that does not obscure the LED is difficult. A simple alternative is to employ the camera's digital zoom feature, at the cost of decreased image resolution.
To operate the iPhone scope, a photo-graphy application allowing control over digital zoom, exposure, focus, and the LED is needed. The
ProCamera
app (no affiliation) was used here and worked quite well. There may be others.
The iPhone scope is best used in a dark room. The phone needs to be held with its long axis horizontally, with steady hands. Notably, the phone's physical format is not well suited for the cramped conditions of direct ophthalmoscopy. The subject must be capable of stable fixation. Working distance is very short, on the order of millimeters.
The photo shows my left optic nervehead, viewed through a 3 mm diameter natural pupil (plus presumably age-related lens opacity, plus 1.5D of astigmatism). As in conventional direct ophthalmoscopy, there is a bright corneal reflex, but this is less disturbing in live views than in static images. The image quality is limited by the need for 6X digital zooming and is a far cry from that of conventional fundus cameras, as exemplified
here: it
is not good enough to recognize minor abnormalities. Without pupil dilation, the field of view is small. Like the webcam scope, the iPhone scope is not really a useful clinical tool. The main reason for making one may be the technical challenge.
Technical details
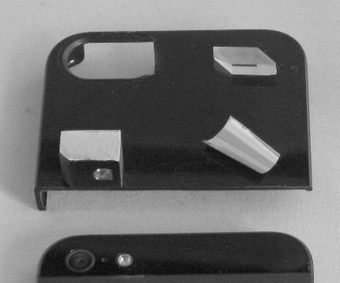
Although the prism can be fastened directly to the phone using double-sided sticky tape, it is more practical to attach the prism to a removable hard phone case. The photograph shows a Hardshell Polycarbonate Case by Belkin, which has a pre-cut window for the lens and the LED (upper left). The lower two-thirds of the case were lopped-off to allow easy mounting and removal.
A parallelogram-shaped prism can be made fairly easily from a scrap piece of clear acrylic, using basic hand tools (top right). It is not necessary to aim for a high optical quality. A simple alternative to careful polishing of the reflecting surfaces is to attach brightly reflecting metal foils (bottom right) to the these surfaces, using transparent epoxy glue. To reduce stray light, the prism needs to be painted matte black, except in the beam entry and exit areas.
It is desirable to restrict the width of the emitted light beam to further reduce stray light. This is difficult to arrange with an acrylic prism. One solution is to make an "air prism" enclosed in an opaque material. To replicate the light path inside the prism in the above schematic figure, three channels intersecting at right angles were drilled in a solid aluminium block and small pieces of reflecting foil were glued at 45° angles at the intersections. The air prism (bottom left) provided good beam width control.
A completely different way to arrange illumination is to use a custom-made flexible light guide as described on the
instructables site. This appears to work quite well but seems to require full dilation of the pupil.
 The prism deflects the illumination beam (blue) 90°, twice. Note that the beam emerges close by the tip of the prism, to meet the requirement of near co-axiality with the viewing beam (red). Positioning is critical, particularly when aiming for use with natural, undilated pupils.
 The photo shows my left optic nervehead, viewed through a 3 mm diameter natural pupil (plus presumably age-related lens opacity, plus 1.5D of astigmatism). As in conventional direct ophthalmoscopy, there is a bright corneal reflex, but this is less disturbing in live views than in static images. The image quality is limited by the need for 6X digital zooming and is a far cry from that of conventional fundus cameras, as exemplified
 A parallelogram-shaped prism can be made fairly easily from a scrap piece of clear acrylic, using basic hand tools (top right). It is not necessary to aim for a high optical quality. A simple alternative to careful polishing of the reflecting surfaces is to attach brightly reflecting metal foils (bottom right) to the these surfaces, using transparent epoxy glue. To reduce stray light, the prism needs to be painted matte black, except in the beam entry and exit areas.